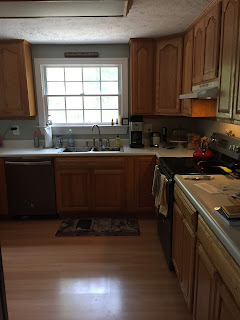
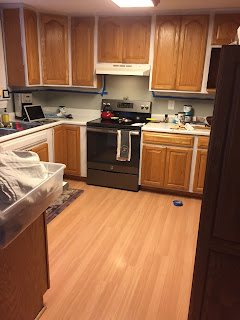
The space was great, but the appliances (most of which only mostly worked, which we found out after inspection) were cheap and icky, the counter tops were a lovely 90's Discovery Zone style confetti laminate, and the combination of yellow-hued fluorescent light and the reflection off the sun-stained cabinets made for a VERY yellow appearance throughout the whole upstairs.
They did a great job photographing for the listing, but upon arrival it was even more obvious that I wanted to get it updated and a little feeling a little cozier and more in line with the style of the rest of the home.
Here are some of their photos...
I have no idea how they got it to feel so bright and clean white for the real estate photos (they must have brought a spot light) because this is what it looked like when we were actually in the home... I know, I know, I also have the light off... but it was SO yellow that it totally distorted the room for photographing when it was on.
Taking on a kitchen redo on a budget can seem really overwhelming... which I know, because everyone and their mother was discouraging us from doing it.
The problem was that they were looking at the listing photos and I was looking at the reality.
SO-- where do you begin???
Tip 1: Choose the right appliances at the right time!
There are some real tricks to getting new appliances... the first one being that you need to know what you really NEED in your appliances. Do you NEED convection bake as an option on your oven? Do you NEED that extra 4 cubic feet for your fridge? Is a standing side by side what you prefer, or do you NEED the bottom drawer freezer option? Do you NEED the 3rd rack for your dishwasher, or do you think that a silverware basket is fine?
...all legitimate questions, and having an idea of what you'd like to spend can help make some of these decisions for you.
I knew that I wanted to have the slate front appliances because:
1. They are fingerprint proof (aka dog nose proof)
2. They are magnetic
3. They are currently only made by GE, which is a brand that I like to support-- also, helps narrow down options!
Once you narrow down what you want... you lie in wait for the perfect sale!
Appliances are something that go on major sale a few times a year from the large retailers. TAKE ADVANTAGE OF THIS! Unless you're really in a bind and your fridge just putzed out, there is NO reason to EVER pay the full sticker price on any of these items.
We ended up buying our appliance suite before we ever moved into the house and just delayed the delivery until we would be there because Home Depot was having a Memorial Day sale that seemed like the best it would be all Summer, and everything I wanted was included!
We saved over $500 by buying at the right time, and I haven't seen the prices dip back down to the level that we bought them at since. If your gut says it's the best deal you're going to find, it probably is.
Tip 2: Don't be afraid of your cabinets!
This was the part of our redesign that I got the most push back from other people about. People COULD NOT TELL ME ENOUGH about how much of a pain in the butt it was to paint cabinets (though most of them had never actually done it), how the paint chips and wears and I'd just have to touch ti up forever. They told me that our cabinets were "fine" or "not that bad".... BARF. The kitchen is the most lived in area of most homes, and for sure the most lived in area of our home. I wanted it to be a space I actually enjoyed looking at!
I played around with the idea of replacing the counters and getting new hardware before making a decision about painting the cabinets... but I was STRUGGLING to find a counter that I liked and that wouldn't totally clash with the brown cabinets and slate appliances that were now installed.
One day I decided to give the cabinets a really good scrubbing, and the whole while my disdain for them grew like wildfire. By the end of that cleaning sesh, I knew that the cabinets had to come before any other changes.
There was no way in hell I was going to spend thousands of dollars on new granite counter tops to still not be totally happy with the kitchen because of these stupid cabinets.
I went with a milkpaint from Farmhouse Paints, and let me tell you... IT WAS SO EASY!
3 days and a buddy was all I needed to get them fully painted and antiqued the way that I wanted! I seriously laughed out loud when I thought about all the people who had been discouraging me from doing it.
Day 1- Cleaning, taping, and cutting in.
*because the hardware for my cabinets is on the inside of the door, it meant that I didn't need to remove the hinges which DEFINITELY saved me time
Day 2- Bulk of the painting... always better with friends... and healthy snacks!
VERY white!
This paint took 3 coats to fully cover... and I ended up needing to get one more quart of paint than I thought. In hindsight, I probably would have been okay with 2 coats simply because of the way the antique gel hid many imperfections, but at the time I figured it was better safe than sorry!
What I LOVED about the Farmhouse Paint was that I didn't need to do anything more than clean my cabinets in order to paint with it. No sanding, no stripping, nothing!
It is a thick paint (which I think is why I ended up using so much) and with patience, it covers beautifully.
Day 3- Antiquing!
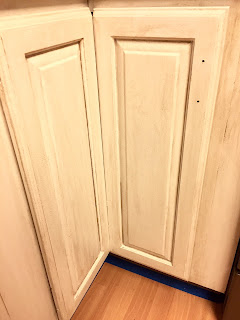
Farmhouse sells a couple of different hues for their antiquing gels, and I went with the "tea stain" one as opposed to one that sounded a bit more grey. I wanted a warm white feeling, and I thought the more brown hue would bring that feeling about better. I bought a whole quart and have enough left over to last a lifetime... but again, better safe than sorry!
To use the gel you simply paint it on, wait a few seconds (seriously, just a few or it dries FOR REAL and it's not coming off), and then wipe it with cheese cloth. I definitely recommend wearing latex gloves and having the windows open when doing this because the stain has a strange sort of fishy smell that you don't want lingering on your hands or in your home any longer than it needs to.
Again, SO STINKING EASY! And turned out exactly how I wanted it on the very first try.
*cue the strange yellow light...
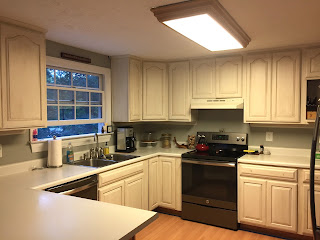
The gel gave the white just the right amount of depth and warmth while still allowing them to keep the room bright (especially after we changed out those horrific bulbs) and more open.
All of the supplies for the painting section cost less than $200. We did go with a bit of a more expensive paint option, but the results that I'd seen made it seem worth it.
Tip 3: The right hardware can make all the difference!
Some may think that cabinet hardware would be a part of the cabinet step, but if you've ever tried to buy new cabinet hardware you know that this deserves a section all on it's own!
I went to every kitchen and bath remodel store in a 20 mile radius and SERIOUSLY found nothing that I even remotely liked!
Knowing what you want is IMPERATIVE when looking for hardware, because otherwise it seems like there are SO. MANY. OPTIONS.
I wanted something dark (like a roughed up black... but not a clean modern black), that was soft in shape. Maybe curved somehow, but definitely not something that looks like it belongs in an industrial kitchen.
UGH. Forever and a day later I was still hunting and feeling extremely frustrated. When something is $3-4 a piece at a minimum and you need A BUNCH of them, online shopping doesn't really seem like a good option. I figured that we needed to have at least a couple hundred dollars in our budget for hardware because... well... those were the prices I was seeing!
Then we got online at some janky websites and started digging around and found the PERFECT pieces... for a FRACTION of the cost.
BONUS: while I found them on a janky website, they were also sold on Home Depot's website! So if they came and I hated them, I could easily run down the road and return them. No harm done.
45 bucks later we had a full set of hardware that's perfect!
Tip 3- Buy LOCAL granite!!!!
I appreciate supporting small businesses in so many ways in my regular life... but it hadn't occurred to me that doing something as scary as buying new granite counter tops is something that we should use a local vendor for!
This is the MOST IMPORTANT tip of them all!
Home Depot, Lowes, and those other large stores WILL NOT have the best price for you when it comes to counter tops!
What I didn't know (until we walked through 3 different granite warehouses after having been scouring HD's prices and supply) is that basically everyone has the same granite. They all have the same levels, the same colors, the same EXACT stones... literally down to the names. This makes it SO EASY to compare prices!
This is an area that is still haggle-able in these United States (and ohhhhhh how I love to haggle!). This is true at Home Depot as well as independent stores-- the prices are never set in stone... I mean... except that they ARE stone ;) bad joke. I digress.
Now, the independent stores will have more wiggle room than a large store for the obvious reasons, but also for one not-so-obvious reason.
They have stones that they've been sitting on for a while and want to move! Or, they have stones that have been partially cut and maybe aren't the right size for a lot of projects... they want these OUT and are way more likely to slash prices if they think you're interested!
These places are just as equipped to install as Home Depot, and usually will have sinks and faucets to choose from as well. It's still one-stop-shopping, but you're supporting a local artisan and saving bookoo bucks in the meantime!
By going to a local vendor instead of Home Depot we ended up with a granite 2 levels higher than we had expected to buy... and we came in more than $2,000 below our budget!
If we'd done the exact same project from Home Depot, it would have cost us almost $4000 more and had us WAY over budget!
 |
| Before |
 |
| After |
Tip 4- Don't be afraid to do something fun!
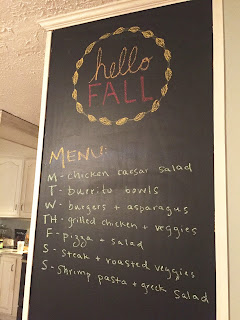
We have this weird stand-alone fridge set up that closes the kitchen off from our living room. One side of that cabinet island was just a full-length version of that ugly brown cabinet wood, and I needed to think of SOMETHING to do with it!
After having painted and antiqued the long side wall of the counter peninsula, I knew that painting and antique-ing that large of a wall space just wouldn't look right. I started playing around with what I could do with it instead!
Should we do an accent wall? Should we make it magnetic? Should we paint it the same as the actual walls?
... we landed on making it into a chalkboard!
Now I can have our meals for the week and the "things to remember" out in the open so they don't get lost... but because the wall isn't at an angle that you really see it a whole lot from the rest of the house, it's the perfect balance of fun and practical! ...or at least that's what we think :)
A quart of paint was something around $15 from the Depot... it did take a few coats to make solid, and they suggest not drawing on it for a few days, but seems like a small price to pay for a whole lot of fun!
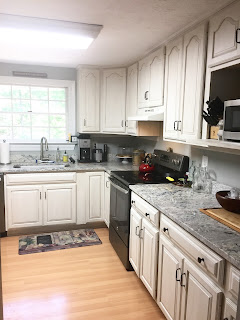
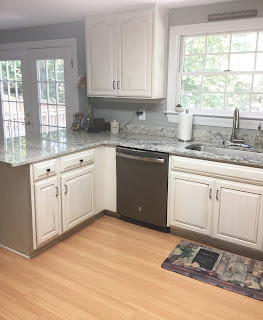
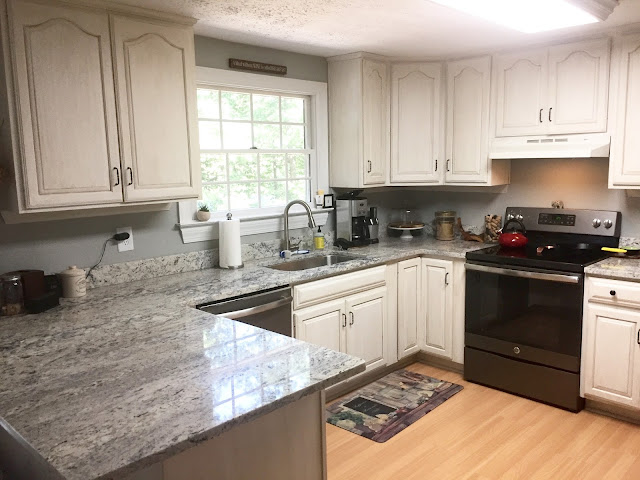
It IS possible to redo your kitchen and come in UNDER budget, AHEAD of schedule, and MUCH happier about your living space!
Here are the final photos!








lovely! Great job Bekha!
ReplyDeleteThank you!!
Delete