Update Your Kitchen Without Going Crazy... or Broke!

Tuesday, September 26, 2017

When we bought our house this Spring, we were SUPER excited that it was ready for us to move in and didn't need any major improvements from us... except for an outdated kitchen that my heart REALLY wanted to take care of as soon as we got moved in!

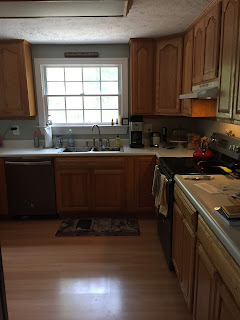
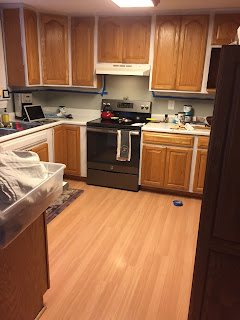
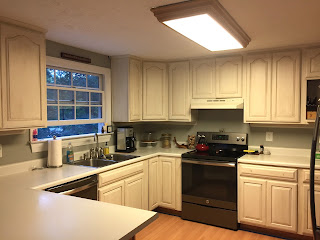
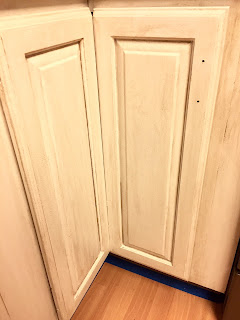
The space was great, but the appliances (most of which only mostly worked, which we found out after inspection) were cheap and icky, the counter tops were a lovely 90's Discovery Zone style confetti laminate, and the combination of yellow-hued fluorescent light and the reflection off the sun-stained cabinets made for a VERY yellow appearance throughout the whole upstairs.

They did a great job photographing for the listing, but upon arrival it was even more obvious that I wanted to get it updated and a little feeling a little cozier and more in line with the style of the rest of the home.

Here are some of their photos...

kitchen renovation, kitchen project, DIY, diy project, do it yourself, kitchen rehab, home depot, granite counters, chalkboard paint, milk paint, milkpaint, home improvement

kitchen renovation, kitchen project, DIY, diy project, do it yourself, kitchen rehab, home depot, granite counters, chalkboard paint, milk paint, milkpaint, home improvement

I have no idea how they got it to feel so bright and clean white for the real estate photos (they must have brought a spot light) because this is what it looked like when we were actually in the home... I know, I know, I also have the light off... but it was SO yellow that it totally distorted the room for photographing when it was on.

kitchen renovation, kitchen project, DIY, diy project, do it yourself, kitchen rehab, home depot, granite counters, chalkboard paint, milk paint, milkpaint, home improvement

kitchen renovation, kitchen project, DIY, diy project, do it yourself, kitchen rehab, home depot, granite counters, chalkboard paint, milk paint, milkpaint, home improvement


Taking on a kitchen redo on a budget can seem really overwhelming... which I know, because everyone and their mother was discouraging us from doing it.
The problem was that they were looking at the listing photos and I was looking at the reality.


SO-- where do you begin???


Tip 1: Choose the right appliances at the right time!
There are some real tricks to getting new appliances... the first one being that you need to know what you really NEED in your appliances. Do you NEED convection bake as an option on your oven? Do you NEED that extra 4 cubic feet for your fridge? Is a standing side by side what you prefer, or do you NEED the bottom drawer freezer option? Do you NEED the 3rd rack for your dishwasher, or do you think that a silverware basket is fine?
...all legitimate questions, and having an idea of what you'd like to spend can help make some of these decisions for you.

I knew that I wanted to have the slate front appliances because:
1. They are fingerprint proof (aka dog nose proof)
2. They are magnetic
3. They are currently only made by GE, which is a brand that I like to support-- also, helps narrow down options!

Once you narrow down what you want... you lie in wait for the perfect sale! 
Appliances are something that go on major sale a few times a year from the large retailers. TAKE ADVANTAGE OF THIS! Unless you're really in a bind and your fridge just putzed out, there is NO reason to EVER pay the full sticker price on any of these items.

We ended up buying our appliance suite before we ever moved into the house and just delayed the delivery until we would be there because Home Depot was having a Memorial Day sale that seemed like the best it would be all Summer, and everything I wanted was included!
We saved over $500 by buying at the right time, and I haven't seen the prices dip back down to the level that we bought them at since. If your gut says it's the best deal you're going to find, it probably is.

Tip 2: Don't be afraid of your cabinets!
This was the part of our redesign that I got the most push back from other people about. People COULD NOT TELL ME ENOUGH about how much of a pain in the butt it was to paint cabinets (though most of them had never actually done it), how the paint chips and wears and I'd just have to touch ti up forever. They told me that our cabinets were "fine" or "not that bad".... BARF. The kitchen is the most lived in area of most homes, and for sure the most lived in area of our home. I wanted it to be a space I actually enjoyed looking at!
I played around with the idea of replacing the counters and getting new hardware before making a decision about painting the cabinets... but I was STRUGGLING to find a counter that I liked and that wouldn't totally clash with the brown cabinets and slate appliances that were now installed.
One day I decided to give the cabinets a really good scrubbing, and the whole while my disdain for them grew like wildfire. By the end of that cleaning sesh, I knew that the cabinets had to come before any other changes.
There was no way in hell I was going to spend thousands of dollars on new granite counter tops to still not be totally happy with the kitchen because of these stupid cabinets.

I went with a milkpaint from Farmhouse Paints, and let me tell you... IT WAS SO EASY! 

3 days and a buddy was all I needed to get them fully painted and antiqued the way that I wanted! I seriously laughed out loud when I thought about all the people who had been discouraging me from doing it.

Day 1- Cleaning, taping, and cutting in. 
*because the hardware for my cabinets is on the inside of the door, it meant that I didn't need to remove the hinges which DEFINITELY saved me time

kitchen renovation, kitchen project, DIY, diy project, do it yourself, kitchen rehab, home depot, granite counters, chalkboard paint, milk paint, milkpaint, home improvement

I cut in the trim on the ceiling carefully without taping, taped around the walls and floor for the baseboards, as well as cut in around the edges of the cabinets where the doors open. I did 2 coats to save time and energy the following day.


Day 2- Bulk of the painting... always better with friends... and healthy snacks! 


kitchen renovation, kitchen project, DIY, diy project, do it yourself, kitchen rehab, home depot, granite counters, chalkboard paint, milk paint, milkpaint, home improvement

kitchen renovation, kitchen project, DIY, diy project, do it yourself, kitchen rehab, home depot, granite counters, chalkboard paint, milk paint, milkpaint, home improvement

VERY white! 
This paint took 3 coats to fully cover... and I ended up needing to get one more quart of paint than I thought. In hindsight, I probably would have been okay with 2 coats simply because of the way the antique gel hid many imperfections, but at the time I figured it was better safe than sorry!

What I LOVED about the Farmhouse Paint was that I didn't need to do anything more than clean my cabinets in order to paint with it. No sanding, no stripping, nothing!
It is a thick paint (which I think is why I ended up using so much) and with patience, it covers beautifully.

Day 3- Antiquing! 

Farmhouse sells a couple of different hues for their antiquing gels, and I went with the "tea stain" one as opposed to one that sounded a bit more grey. I wanted a warm white feeling, and I thought the more brown hue would bring that feeling about better. I bought a whole quart and have enough left over to last a lifetime... but again, better safe than sorry!


To use the gel you simply paint it on, wait a few seconds (seriously, just a few or it dries FOR REAL and it's not coming off), and then wipe it with cheese cloth. I definitely recommend wearing latex gloves and having the windows open when doing this because the stain has a strange sort of fishy smell that you don't want lingering on your hands or in your home any longer than it needs to.

Again, SO STINKING EASY! And turned out exactly how I wanted it on the very first try.


*cue the strange yellow light...

kitchen renovation, kitchen project, DIY, diy project, do it yourself, kitchen rehab, home depot, granite counters, chalkboard paint, milk paint, milkpaint, home improvement

kitchen renovation, kitchen project, DIY, diy project, do it yourself, kitchen rehab, home depot, granite counters, chalkboard paint, milk paint, milkpaint, home improvement

kitchen renovation, kitchen project, DIY, diy project, do it yourself, kitchen rehab, home depot, granite counters, chalkboard paint, milk paint, milkpaint, home improvement

The gel gave the white just the right amount of depth and warmth while still allowing them to keep the room bright (especially after we changed out those horrific bulbs) and more open.

All of the supplies for the painting section cost less than $200. We did go with a bit of a more expensive paint option, but the results that I'd seen made it seem worth it.


Tip 3: The right hardware can make all the difference! 
Some may think that cabinet hardware would be a part of the cabinet step, but if you've ever tried to buy new cabinet hardware you know that this deserves a section all on it's own!

I went to every kitchen and bath remodel store in a 20 mile radius and SERIOUSLY found nothing that I even remotely liked!
Knowing what you want is IMPERATIVE when looking for hardware, because otherwise it seems like there are SO. MANY. OPTIONS.
I wanted something dark (like a roughed up black... but not a clean modern black), that was soft in shape. Maybe curved somehow, but definitely not something that looks like it belongs in an industrial kitchen.
UGH. Forever and a day later I was still hunting and feeling extremely frustrated. When something is $3-4 a piece at a minimum and you need A BUNCH of them, online shopping doesn't really seem like a good option. I figured that we needed to have at least a couple hundred dollars in our budget for hardware because... well... those were the prices I was seeing!

Then we got online at some janky websites and started digging around and found the PERFECT pieces... for a FRACTION of the cost.
BONUS: while I found them on a janky website, they were also sold on Home Depot's website! So if they came and I hated them, I could easily run down the road and return them. No harm done.

45 bucks later we had a full set of hardware that's perfect! 

kitchen renovation, kitchen project, DIY, diy project, do it yourself, kitchen rehab, home depot, granite counters, chalkboard paint, milk paint, milkpaint, home improvement

kitchen renovation, kitchen project, DIY, diy project, do it yourself, kitchen rehab, home depot, granite counters, chalkboard paint, milk paint, milkpaint, home improvement

*can you tell I took these pics after we swapped out the awful bulbs??


Tip 3- Buy LOCAL granite!!!! 
I appreciate supporting small businesses in so many ways in my regular life... but it hadn't occurred to me that doing something as scary as buying new granite counter tops is something that we should use a local vendor for!
This is the MOST IMPORTANT tip of them all!
Home Depot, Lowes, and those other large stores WILL NOT have the best price for you when it comes to counter tops!

What I didn't know (until we walked through 3 different granite warehouses after having been scouring HD's prices and supply) is that basically everyone has the same granite. They all have the same levels, the same colors, the same EXACT stones... literally down to the names. This makes it SO EASY to compare prices!
This is an area that is still haggle-able in these United States (and ohhhhhh how I love to haggle!). This is true at Home Depot as well as independent stores-- the prices are never set in stone... I mean... except that they ARE stone ;) bad joke. I digress.

Now, the independent stores will have more wiggle room than a large store for the obvious reasons, but also for one not-so-obvious reason.
They have stones that they've been sitting on for a while and want to move! Or, they have stones that have been partially cut and maybe aren't the right size for a lot of projects... they want these OUT and are way more likely to slash prices if they think you're interested!

These places are just as equipped to install as Home Depot, and usually will have sinks and faucets to choose from as well. It's still one-stop-shopping, but you're supporting a local artisan and saving bookoo bucks in the meantime!

By going to a local vendor instead of Home Depot we ended up with a granite 2 levels higher than we had expected to buy... and we came in more than $2,000 below our budget!
If we'd done the exact same project from Home Depot, it would have cost us almost $4000 more and had us WAY over budget!

kitchen renovation, kitchen project, DIY, diy project, do it yourself, kitchen rehab, home depot, granite counters, chalkboard paint, milk paint, milkpaint, home improvement
Before
kitchen renovation, kitchen project, DIY, diy project, do it yourself, kitchen rehab, home depot, granite counters, chalkboard paint, milk paint, milkpaint, home improvement
After


Tip 4- Don't be afraid to do something fun!
We have this weird stand-alone fridge set up that closes the kitchen off from our living room. One side of that cabinet island was just a full-length version of that ugly brown cabinet wood, and I needed to think of SOMETHING to do with it!
After having painted and antiqued the long side wall of the counter peninsula, I knew that painting and antique-ing that large of a wall space just wouldn't look right. I started playing around with what I could do with it instead!
Should we do an accent wall? Should we make it magnetic? Should we paint it the same as the actual walls?
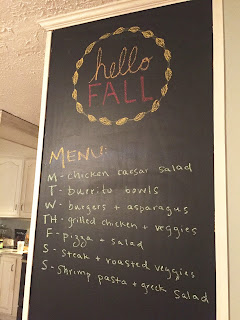
... we landed on making it into a chalkboard!
Now I can have our meals for the week and the "things to remember" out in the open so they don't get lost... but because the wall isn't at an angle that you really see it a whole lot from the rest of the house, it's the perfect balance of fun and practical! ...or at least that's what we think :)

A quart of paint was something around $15 from the Depot... it did take a few coats to make solid, and they suggest not drawing on it for a few days, but seems like a small price to pay for a whole lot of fun!

kitchen renovation, kitchen project, DIY, diy project, do it yourself, kitchen rehab, home depot, granite counters, chalkboard paint, milk paint, milkpaint, home improvement


It IS possible to redo your kitchen and come in UNDER budget, AHEAD of schedule, and MUCH happier about your living space! 

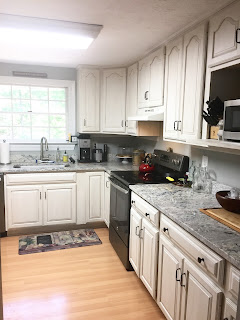
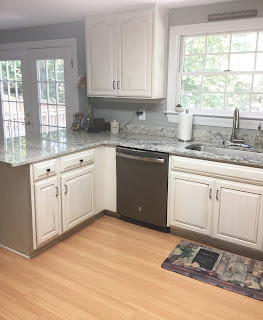
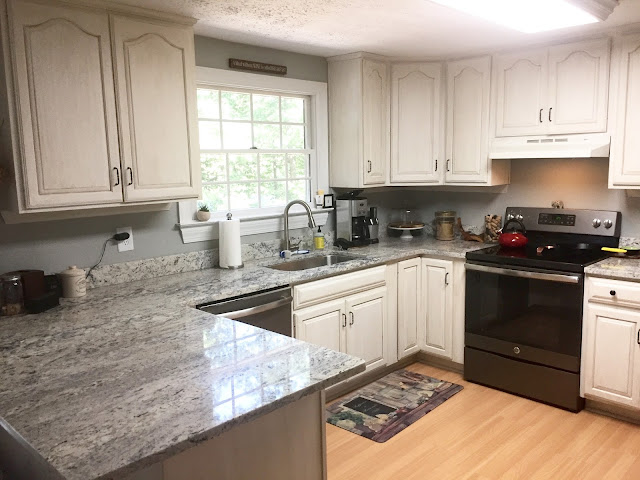
Here are the final photos! 


kitchen renovation, kitchen project, DIY, diy project, do it yourself, kitchen rehab, home depot, granite counters, chalkboard paint, milk paint, milkpaint, home improvement

kitchen renovation, kitchen project, DIY, diy project, do it yourself, kitchen rehab, home depot, granite counters, chalkboard paint, milk paint, milkpaint, home improvement


kitchen renovation, kitchen project, DIY, diy project, do it yourself, kitchen rehab, home depot, granite counters, chalkboard paint, milk paint, milkpaint, home improvement


kitchen renovation, kitchen project, DIY, diy project, do it yourself, kitchen rehab, home depot, granite counters, chalkboard paint, milk paint, milkpaint, home improvement

kitchen renovation, kitchen project, DIY, diy project, do it yourself, kitchen rehab, home depot, granite counters, chalkboard paint, milk paint, milkpaint, home improvement


kitchen renovation, kitchen project, DIY, diy project, do it yourself, kitchen rehab, home depot, granite counters, chalkboard paint, milk paint, milkpaint, home improvement


Truths About the First Trimester that *Apparently* No One Tells You

Tuesday, September 19, 2017

You're pregnant?! Congrats! ...how many freak outs have you had already???

Let's start with the first REAL truth that no one is going to tell you... IT'S OKAY TO FREAK OUT. It's okay to feel immediately wonder how in the heck YOU are supposed to be a parent!
I remember exactly the moment that I read the "Yes+" on the pregnancy test. I felt completely overwhelmed. I felt tiny. All of a sudden my thoughts went to "Oh my GOSH, are we ready for this?! Am I ready for this? What even IS this? Am I responsible enough to be in charge of some tiny human for the rest of forever?!" ...see what I mean??? Freak Out #1.

Whether you've been planning for years, trying for months, or can't believe that it happened at all... you're allowed to feel the full breadth of emotions about this! You can feel thrilled and terrified and excited and happy and nauseas (but we'll get into that later) about it all at the same time. It's okay. It's a BIG DEAL! A good big deal, a beautiful big deal, but a big deal none-the-less.

Something that I thought was so strange when we started telling people that I was pregnant was the "OH MY GOSH ARE YOU JUST SO EXCITED?!" response.
Thankfully, I am in a very wonderful and stable marriage, and so OF COURSE we were happy and excited... but there were also lots of other feelings going on inside of us. A little shock, some apprehension, some disbelief, more than a handful of nerves about what was coming down the pike for us.
When you find out that your couple is inviting another human along FOREVER, that's pretty reality shifting!
Let yourself feel all the things. Talk about those things. Reflect on those things. It's okay if you're not glowing all the time at the prospect of life as you know it fundamentally shifting forever. (Sorry... did that instigate Freak Out #2??)

The good news is that whether you're on the far end of the scale and simply THRILLED or on the other end of the scale and simply TERRIFIED... you have a nice long time to figure some things out and adjust before that babe actually shows up on your door step. So take a deep breath. It's going to be fine.

----------------------------------------


When I got pregnant, I did what any sane millennial would do... immediately got on the internet to seek out information from a bunch of NOT professionals to tell me what I should "expect" to be feeling as I got deeper into it.
What I've learned since those days of frantic googling to see how many symptoms I was experiencing and what the likelihood was that they meant I was going to have a healthy pregnancy would be is that having expectations about your pregnancy is mostly an exercise in futility. 
Let's just all try to live in the moment and do what we need to do for our bodies right now as opposed to place some random stranger's expectations (good or bad) onto ourselves... deal??
Because as soon as you think you've got "it" figured out, it's all going to change.

But... you are reading this, after all, to hear a little truth... so here goes:

Truth #1: Whoever coined the phrase "morning sickness" really did us a disservice. Before you get pregnant you think that there's like a bit of a queasy feeling in the morning, and maybe you'll yack a few times... but after mid-day passes you'll be glowing like Heidi Klum on the runway.
Yeah. Right.
For many of us, "all day and night sickness with momentary reprieves for carbo loading" is what this time really should be called. With any luck, it will end around the end of your first trimester (which did you know is actually week 14ish instead of week 12ish?? I didn't know that until I was praying for said sickness to finally cease and found out I had at least 2 more weeks). Unfortunately, not everyone is in the clear at that 1st trimester point... I, ironically, am writing this to you today as I near week 20 of my pregnancy and just returned to my computer from yacking unexpectedly.
What can you do? ...not much.
Maybe pray extra hard that you'll be one of the lucky pregnancy unicorns who feels energized and beautiful during her first trimester. I have known a few of them-- so, my fingers are crossed for you, sister!

pregnancy, first trimester, babies, pregnancies, morning sickness, nutrition, fitness, fit pregnancy, healthy pregnancy


Truth #2: When it comes to exercise during your first trimester, bless and release! ....Release any expectations that you have about continuing your regular regimen. Release any expectations that you will maintain your running pace. Release any expectations that you will continue to make strength gains.
This is NOT to say that you can't do any or all of those things... but, please, lighten your expectation load and listen to your body. It's okay if you can't muster more than a walk once a week during your first trimester. If you feel that terrible, chances are you're not eating that much either, so your fears of gaining 30 lbs before week 12 aren't going to come true.
I ran a marathon at week 6 of my pregnancy and then literally didn't exercise more than a handful of times for the following 2 months because I simply couldn't... and I had been in the best shape of my life.  There is NO WAY to know how your body will react to this massive change, and there is nothing you can do to be sure that you won't fall flat on your face.
The last thing that your body and your baby needs from you is to pass out or initiate unnecessary barfing because your pride is injured.

For those of us who love a good sweat sesh more than anything and would rather run a marathon than be forced to eat a box of Crispy Cremes, this truth can be excruciating. It doesn't matter how hard you fight it though... if your body doesn't want to handle your exercise load, it won't let you continue. So be gentle with yourself, and know that you will probably come out of it and be able to get back into a routine in a few weeks.
You baby is more important than your 5-k pace right now anyways. Deal?

This need to release our exercise expectations all comes down to energy.
When I got pregnant and was reading all the lists of "what to expect" there was one word that I literally had to GOOGLE because I just didn't understand what they meant. What was the word? ..."fatigue." Seems hilarious that I would have to look up what that meant... but I'm not someone who gets "fatigued" and I wanted a proper description.
I wake (**woke) at 5:30 without an alarm, I'd never consider an afternoon nap, I was excited about a hearty exercise routine and very frequently woke up pumped about my upcoming 10 mile run for Saturday morning. So "fatigue" was a foreign word to me... until... one day... one o'cloock rolled around and I actually died for 3 hours on my friend's couch. And then the next day it happened again. And then the next day I barely zombied my way from rising through trying to stuff some peanut butter and pretzels down my pie hole before again passing out for an afternoon nap. This lasted my entire first trimester, hitting extra hard at exactly 1 pm... the worst part? I never woke up actually feeling better. I always needed some kind of quick sugar (usually gatorade) to revive me enough to even get out of bed.
My definition of fatigue associated with pregnancy would be something more akin to a zombie being hit by a bus. Daily.
If you're feeling this way, please know that you're not alone. I know how much it sucks and how frustrating it can be to feel like you've somehow done NOTHING all day and are still exhausted.
My only advice? Find some good shows to binge watch my friend, because you're not going to be very productive when this time hits you.

pregnancy, first trimester, babies, pregnancies, morning sickness, nutrition, fitness, fit pregnancy, healthy pregnancy


Truth # 3: Pregnancy nutrition is not like regular nutrition. 
We all have grand intentions when we get pregnant that we are going to be THOSE women who continue to eat healthy and make the best choices EVERRRRRRR for our babies.
I actually used to scoff at women (of course only in my head) who said that they could "only eat carbs" and "couldn't remember the last time they ate a vegetable" during their first trimester.
HA! The universe has a funny way of getting us back for things like that. 
Wanna know how I survived my first trimester?? It was really simple... so I'll tell you.
Pepperoni pizza, caesar salad (no question this baby is Italian), gatorade, and gold fish.
Okay, sometimes I had stromboli instead of pizza, and sometimes I had pretzel rods instead of gold fish... but ummmm... you get the point.
Oh... and whole milk and ice cream :) ...I actually had ice cream 15 days in a row at one point.
Hilarious.
Disgusting.
Something I would have ABSOLUTELY judged another woman for doing and ADMITTING before I, myself, was so inconsolably ill and these were the only things that would help me survive a day. Sometimes a calorie needs to just count as a calorie and left in the past.
So here's what I have to say to you about how YOU eat during your first trimester: Girl, do your best... and then just let it go. If you feel great, then BY ALL MEANS keep eating healthy! This is NOT a permission slip to binge on crap just because you're pregnant. BUT... if the thought of something green actually makes you turn green... again, give yourself a little grace and survive until it passes. It will pass. One day you will wake up and want to explore your fridge a little bit more. But until that day comes, don't beat yourself up. Your baby is already doing that enough.

pregnancy, first trimester, babies, pregnancies, morning sickness, nutrition, fitness, fit pregnancy, healthy pregnancy


Along with the reading you've done about "what to expect" came probably some reading about "what do I need?" ... Honestly... you don't need much for the first trimester. But there are a few things that I have found useful that I figured I'd share with you here.

1. A solid set of survival snacks that you keep with you at all times. Hoard them. Label them. Threaten whoever lives in your house so that they leave them alone. There is nothing worse than having only ONE food that sounds like it won't make you barf, but finding that the last one was eaten when your husband was looking for a snack yesterday. Death, tantrums, and full on breakdown may ensue if this happens. Prepare accordingly. Keep gatorades in the fridge, hide goldfish in your purse, keep granola bars in your car. This is serious business ladies. No carb left behind.

2. Find yourself a good waxer. Yes. You ready that correctly. An esthetician who specializes in whatever hair removal you typically do yourself. You know how they talk about how thick and luscious and fast growing your hair is when you're pregnant???... well... news flash, honey. It's not just on your head. You may think that this sounds vain (and maybe a little bit of it is), but comfort is going to be huge the next few months, and anything you can do to eliminate your own personal responsibility (read as: extra energy required) for maintaining just about anything is HUGELY VALUABLE. Find your nearest European Wax Center or other reputable wax studio and buy a package. Just do it. And do it early so that when your... ahem... *down there* is a little more sensitive later in pregnancy, it won't even be an issue anymore because you'll be in a good routine!

3. Find a good toner that won't rough up your skin. As your hormones explode, you may find that some of that long forgotten teenage acne crops back up... and not only on your face. Your body is going through a lot of changes, and that means that you're overproducing some oils... I got zits in the weirdest places... like my FOREARMS on a couple of occasions-- I'm sorry... WHAT?! So grab a toner that will dry out your problem zones before they become real problems. Lots of gals I know struggle with chest and shoulder breakouts at different stages... and it's amazing how quickly it can be fixed with a little alcohol! There are plenty of cheap brands out there-- witch hazel is a good natural option :)

4. While you want to dry out some things you also want to LOTION UP! Make sure that you've got a really clean, moisturizer for both your face and your body! Keeping your skin balanced will help prevent break outs, but down the road will help ease itchiness as your skin starts to stretch out. Remember that your skin is your biggest organ, and that it absorbs everything that you put on it-- so try to stay away from icky chemical moisturizers as you are going to be using A LOT of lotion the next few months!
Try out this lotion :)

5. Exfoliate well, exfoliate often! Along with keeping toner and lotion on hand, the best thing you can do for your changing skin right now is exfoliate! Using a gentle cleanser that doesn't strip your skin will help you not only avoid those breakouts, but **maybe** will help us stretch more gracefully later! There is no way to really know if anything can prevent stretch marks (it's mostly up to your genetics unfortunately) but exfoliating, lotion-ing up, and staying hydrated are our best bets. Grab one of those loofah shower gloves, and use it every day!
I use this scrub on my face, neck, chest, and shoulders a few times a week. We'll see where the jury falls on stretch marks... but for now, I know that this is helping the skin people actually see stay much healthier ;)


Bottom line: The first trimester is about survival. And you will survive. And you will come out on the other side feeling more stable about being pregnant and more ready to start looking into the more practical things... like registry, and nursery decorating, and maternity clothes, and labor prep, and ....okay... no need to start Freak Out #3 just yet ;)

Give yourself some grace these first few months, mama. Take time for yourself, and try to not be too mean to your husband. He doesn't understand how you feel, and that's okay... just remember that he's cute and you do still love him even if he eats the last slice of pizza without asking.


Stay strong, stay positive, and remember that this too shall pass. 

xo- B

ps. If you'd like a little camaraderie during your pregnancy, join us on Facebook over at the Pregnancy Playbook! It's a free group where we expectant gals are hanging out, sharing laughs, and keeping it real about what's going on!

pps. If you're feeling good and are ready to hop back into your workout routine and healthy lifestyle... or maybe you didn't have a routine BEFORE but want to support your healthy growing bod now, APPLY HERE to join our next health and fitness accountability group! We call them "Challenge Groups" because we challenge ourselves and each other every day to be our best selves! Learn more about what a challenge group is here. 

The Best Face Scrub You'll Never Buy

Tuesday, September 19, 2017

We all want that healthy morning glow, right?! So how do we make that happen??

Aside from eating a balanced diet, exercising to promote blood flow, and keeping our skin hydrated... the best thing we an do to brighten and liven it up is EXFOLIATE!

This scrub smells like a bakery, is just the right amount of rough for daily or every other day use, and best of all, won't leave your skin feeling dry and tight!

Use on your face, neck, chest, shoulders... really anywhere that you think could use a little sloughing!


The Best Face Scrub You'll Never Buy

Mix:
1/2 cup coconut oil
1/2 cup baking soda
5 drops (or more if you prefer) lemon essential oil

Store in an air tight container and scrub a dub when you need a little freshening!


facial scrub, face scrub, face wash, natural, all natural, coconut oil, recipe, exfoliate, lemon scrub, healthy home, wellness


Looking for a natural lotion to use for daily hydration? Check out this recipe for The Best Lotion You'll Never Buy

The Best Lotion You'll Never Buy

Tuesday, September 19, 2017

Looking for a simple, effective, all natural lotion for your family?

This has become a staple in our house, and I think that you will love it too!

A little thicker than store bought, it keeps best in a mason jar... though you can add a little bit extra of the liquid oil if you want to thin it out for pumping.


The Best Lotion You'll Never Buy

Melt together using either double boiler or carefully watched microwave (I suggest 30 second intervals):
1 cup coconut oil
1/2 cup shea butter

Stir in:
6 tablespoons apricot oil
*essential oils of choice

Chill in the freezer in a glass bowl in 5 minute intervals to cool, stirring with a fork (to break up any chunks, easier to clean than a whisk) in between until it becomes the desired consistency.

Store in mason jars or other sealed container.


lotion, natural, all natural, coconut oil, recipe, hydrate, body lotion, healthy home, wellness

lotion, natural, all natural, coconut oil, recipe, hydrate, body lotion, healthy home, wellness


*I don't add any EOs to this lotion because I prefer unscented lotion for daily use and so that the whole family can enjoy it. Good ones would be frankincense, geranium, or lavender.

Looking for a gentle scrub that can keep your skin bright and healthy? Check out The Best Face Scrub You'll Never Buy
Proudly designed by | mlekoshiPlayground |